Step 4: New Address
Now we’re flying…
Now you need a new address! First off know that the address you choose should be listed in your general area (usually within 100 miles of your IP address). The reason for a local address is that eBay is able to geolocate your IP address down to just a few miles. If you don’t believe me click here and scroll down.
Here is an example of that…
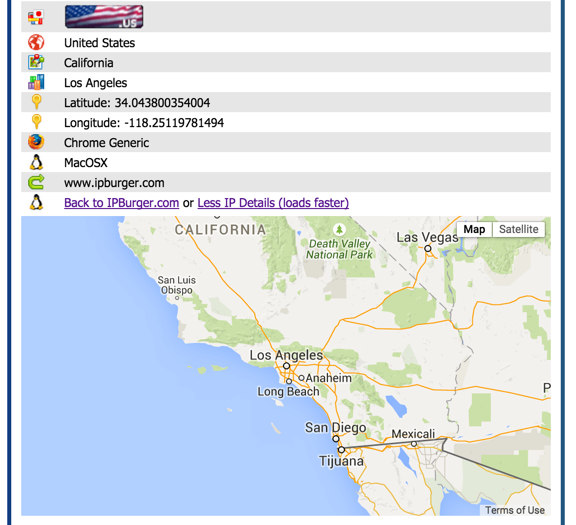
Let’s say you give eBay an address in London but your IP address geolocates back to Los Angeles, California.. this is a RED flag and what will usually happen is that your account will become limited pending further review. Instead you’ll want to stick to an address within 100 miles of your IP Address.
Note: If you’re using a VPN or some sort of remote connection (we talked about this earlier), you can create an account wherever your IP address geolocates.
 Now let’s talk about the address itself. Obviously there are a lot of options. The BEST option is a REAL address in which you can ACCESS. Now there are many ways to acquire a real address that you can access, some options being free and others costing money. You can also go the route of using an address you can’t access, but as you probably already know there are major disadvantages to going this route. We’ll talk about the different options next. Select the option that works best for you and move on to the next step.
Side Note for Account Verification
It’s irresponsible for eBay and PayPal NOT to verify an address (to see if it’s real) or know the people whom reside at that address. Heck this information is freely available online. And for this reason the address you choose MUST be real (to have fewer account problems).
EBay has access to databases of residential addresses (United States Members) and have details about who lived at the address along with credit details for account verification. If an address is made up it won’t be in eBay’s system and your won’t be able to verify your account (often leading to alternative means of verification or suspension).
Note: We’ll get into the details of getting verified later in the guide. Your job at this point is to simply obtain a real and accessible address (discussed next) and to continue the account creation process. Don’t worry about verification right now.
Next we’ll go over the different options for a new address. Select the option that works best for you and then move on to the next step!